


Today I have some proud mommy pictures to share with you. What mom isn't proud when her little one learns something new? Well, I have to say I was very proud when my little one learned to stamp. :) My older daugher has been stamping for years and is a expert (at least as big an expert as an almost 5 year old can be). When I was working on my Valentines projects a couple weekends ago, I knew that I need to make a card for my younger daugher (17 months) to give to daddy. At first I thought I would just make another card and give it him from her. Then I saw the cute card my older daughter made him all by herself and though it would be more special if Allison made him a card herself as well. So I let her stick some heart stickers on a piece of card stock then I got out her name stamp (the Love Bots personalized one) and showed her how to ink it up then stamp it on the paper. She picked it up in no time and was stamping away! I quickly grabbed my camera and took a few shots of my new little stamper. :) The pics aren't that great because she was sitting on my lap and there wasn't much room, but here you go!
Tuesday, February 23, 2010


Monday, February 22, 2010
Quilt Square Big Shot Fabric Project
 Today I have one last Big Shot fabric project to share with you - a quilt square. For this last project, there is pattern and additional information you can download by clicking here.
Ingredients:
- Sizzix Big Shot
- 5-Point 3D Star Bigz die
- Scallop Circle #2 Bigz die
- Background fabric (two 10" x 10" squares)
- 10" x 10" square 100% cotton batting
- Ric-rac (6")
- Sewing machine and thread
Instructions:
- Die cut four pieces of fabric using Big Shot and 5-Point 3D Star Bigz die. Round off hard edges.
- Die cut two large scallop circles using Big Shot and Scallop Circle #2 Bigz die.
- Die cut one small scallop circle using Big Shot and Scallop Circle #2 Bigz die.
- Insert cotton batting between two squares of background fabric and sew together using sewing machine and thread.
- Sew four flower petals (from 5-Point 3D Star Bigz die) to square. Fold large scallop circle in half and adhere to bottom of flower petals.
- Fold small scallop circle in half, then fold over part way to create one gather. Adhere to bottom of flower using sewing machine and thread.
- Adhere ric-rac stem to square using sewing machine and thread.
- Create leaf by cutting large scallop circle in half, then folding inner edge, and sewing each half on square.
- Wash and dry to give shabby-chic look.
To Order Stampin' Up! Products On-Line 24/7, CLICK HERE!

Sunday, February 21, 2010
Onsie Big Shot Fabric Project
 Today's Big Shot fabric project is my favorite! Check out this super cute Onsie! This is a super cute way to dress up a boring Onsie. This would make an adorable shower gift, don't you think?
Ingredients:
- Pretty in Pink taffeta ribbon
- Sizzix Big Shot
- Pennant Bigz XL die
- Scallop Circle #2 Bigz die
- 1" wide elastic
- Sewing machine and thread
- Baby onesie
- Fabric
Instructions:
- Die cut 12 pennants using Big Shot and Pennant Bigz XL die. Gather and adhere to 1" elastic using sewing machine and thread.
- Die cut seven small scallop circles using Big Shot and Scallop Circle #2 Bigz die. Fold over five scallops and adhere to collar of onesie using sewing machine and thread.
- Die cut 10 small scallop circles using Big Shot and Scallop Circle #2 Bigz die. Gather the circles across three of the scallops on the same double-thread. Tie off.
- To create ribbon flowerette, tie a knot in the end of Pretty in Pink taffeta ribbon, then tie a new knot every three inches. Gather the ribbon in between each knot.
- Adhere ribbon to flower, then sew entire piece to onesie.
- Wash and dry to give shabby-chic look.
Saturday, February 20, 2010
Memory Keeper Big Shot Fabric Project
 Here is today's Big Shot fabric project - a super cute memory keeper!
Ingredients:
- Soft Suede polka dot grosgrain ribbon
- Linen thread
- 5/8" Jumbo brads
- Sizzix Big Shot
- Lattice Bigz die
- Beautiful Butterflies Bigz die
- 18" x 18" artist canvas
- Background fabric (2/3 yard)
- Push pins
- Thumbtacks
Instructions:
- Adhere background fabric to canvas.
- Die cut lattice shapes from fabric using Big Shot and Lattice Bigz die. Adhere to fabric in rows.
- Adhere Soft Suede polka dot grosgrain ribbon to fabric in crisscross pattern. Attach 5/8" Jumbo brads where ribbon intersects. Adhere Soft Suede polka dot grosgrain ribbon around outside edges of canvas.
- Die cut six large and six small butterflies using Big Shot and Beautiful Butterflies Bigz die. Create double-sided butterflies by adhering butterflies together, resulting in three large and three small double-sided butterflies. Tie linen thread around the middle leaving two long ends for antennae. Attach butterflies to canvas using push pins.
Friday, February 19, 2010
Big Shot Headband

Here is today's Big Shot fabric project - a super cute headband! What little girl wouldn't look adorable in one of these?
Ingredients:
- Corduroy button
- Sizzix Big Shot
- Scallop Circle #2 Bigz die
- Fabric
- Needle and thread
- Headband
Instructions:
- Die cut 10 large scallop circles using Big Shot and Scallop Circles #2 Bigz die. Cut off eight of the scallops from each scallop circle. Gather together across the flat side about 1/4" from edge, gathering all 10 circles on the same double-thread. Tie off.
- Die cut eight small scallop circles using Big Shot and Scallop Circles #2 Bigz die. Gather the circles across three of the scallops on the same double-thread. Tie off.
- Die cut four small scallop circles using Big Shot and Scallop Circles #2 Bigz die. Fold circles in half, then in half again. Gather together across the bottom, gathering all four circles on the same double-thread. Tie off.
- Layer scallop circles and sew together.
- Attach Corduroy button through center.
- Die cut small scallop circle using Big Shot and Scallop Circles #2 Bigz die. Adhere to bottom of layered fabric pieces.
- Cut two strips of fabric and adhere over headband to secure scallop circle flower to headband.
To Order Stampin' Up! Products On-Line 24/7, CLICK HERE!
Thursday, February 18, 2010
Creating With Fabric and the Big Shot
Did you know that you can use the Big Shot for more than just papercrafting? Use can use it on fabric too. Fabric is one of the industry's hottest trends right now, and the best part is, you don't even need to be a seamstress to get in on the action! You can create gorgeous fabric accessories and home décor, all without ever touching a sewing machine. Over the next few days I am going to share with you projects that you can create using the Big Shot and Dies from Stampin' Up! Don't have a Big Shot yet? Well now is the perfect time to get one! During Sale-A-Bration, you can early lots of free merchadise when you purchase a Big Shot and accessories! Contact me to place to your order. But, hurry because Sale-A-Bration ends on March 31st!
The first project I have to share with you is a cute ponytail holder. You can use fabrics of your choice to create a varity of these to go with every outfit! So cute for little girls too!

Ingredients:
- Corduroy button
- Sizzix Big Shot
- Scallop Circle #2 Bigz die
- Fabric
- Needle and thread
- Ponytail elastic
Instructions:
- Die cut 10 large scallop circles using Big Shot and Scallop Circles #2 Bigz die. Cut off eight of the scallops from each scallop circle. Gather together across the flat side about 1/4" from edge, gathering all ten circles on the same double-thread. Tie off.
- Die cut 10 small scallop circles using Big Shot and Scallop Circles #2 Bigz die. Gather the circles across three of the scallops on the same double-thread. Tie off.
- To cover Corduroy button, die cut a small scallop circle, then cut off all scallops. Gather the fabric around the edge, place button in the middle, then gather up threads and tie off.
- Attach ponytail elastic to back, then sew through all layers of fabric (including fabric around button), so fabric layers are connected to elastic.
To Order Stampin' Up! Products On-Line 24/7, CLICK HERE!
Wednesday, February 17, 2010
Valentines Day Cards
Yes, Valentines Day was a few days ago, but I am just getting around to posting the projects I did. :) First, we have the cards.
Here is the card I did for Allison.

Here is Aimee's card. If you have been following my blog you will recognize this card from a swap from the demo swap last month. Me doing this card for the swap was killing two birds with one stone. I knew I wanted to give this card to Aimee, but I also thought it would be good for the swap. So, doing this actually saved me time! :)

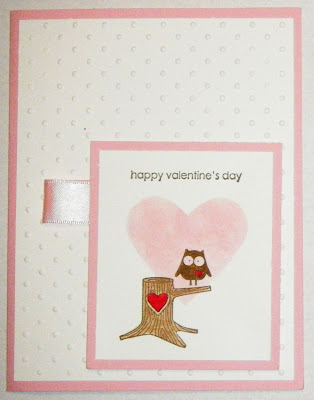
Next, here is the card that I made for my hubby.

I also made some bag tags for the gift I gave my girls. I used my Big Shot and the Two Tags die to cut these out. I also used the personalized name stamps that I bought for them to personalize them.

Here they are on the bags.


 And here is a shot of the whole Valentines display. :) Notice the mailboxes. I made these several years ago and each year I bring them out and fill them with goodies. Kind of like a Christmas stocking for Valentines day! :)
Tuesday, February 16, 2010
Decor Elements Chunky Frame
Today I have a Decor Elements project to share with you. My up-up-upline Tami had done a project using the new Decor Elements Chunky Frame and had it on display at our last group get together. I feel in love with what she had done and had to make one myself! It was so easy! The frame is a lot bigger than I thought (12" x 12" with a 4" x 4" opening). I used the Scallop Frame Decor Element in Chocolate Chip and applied it directly to the frame. Next I used the Sweet Pea Stitched Felt, Pretty in Pink Corduroy Buttons, and the Certainly Celery and Pretty in Pink Satin Ribbon from the Occasions Mini Catalog to embellish the frame. Then I picked out a saying from the Chat Room Rub-Ons (also from the Occasions Mini Catalog) and rubbed that right on the frame. Then last, but not least, I picked out a picture of my younger daughter Allison to put in the frame! So easy and so cute! Love it!

To Order Stampin' Up! Products On-Line 24/7, CLICK HERE!

Saturday, February 13, 2010
February Technique Class
I held my February Technique Class last weekend and wanted to share the cards we made. First, we did this card using the Reverse Applique Technique. This technique is a great way to use up all those scraps of designer paper that I usually can't bear to part with. This technique can also be done using ribbon scraps as well.
 Next we did this card using the Reverse Masking technique.
 Next we did this card using the Reverse Masking technique.
Next, here is the card that we did using the spotted background technique.


And last, but not least, here is the card we did using the Distressed Edge Technique. My gals have been requesting more masculine cards, so this card help fulfill that request as well. :)

February Demonstrator Swap
This month it was my turn to pick our monthly demon stator swap challenge for my Inky Gals group (yes, we officially have a name now!). I decided to challenge the team to make a Valentines Day card using non-traditional colors (meaning no red or pink). Check out everyone came up with!
First, here is my card using the Love Bandit set:
 Here is Kim's card.:
 Here is Wina's card (it was her first swap - welcome to the team Wina!):
 And here is Merrigrace's card:

Funny how there are definitely color themes with these, huh? No we did not discuss what colors to use ahead of time. The cards just ended up matching! :) I am still waiting for 3 of the demos on the team to send their swaps, so I will post those when I get them!
To Order Stampin' Up! Products On-Line 24/7, CLICK HERE!
First, here is my card using the Love Bandit set:
 Here is Kim's card.:
 Here is Wina's card (it was her first swap - welcome to the team Wina!):
 And here is Merrigrace's card:
Funny how there are definitely color themes with these, huh? No we did not discuss what colors to use ahead of time. The cards just ended up matching! :) I am still waiting for 3 of the demos on the team to send their swaps, so I will post those when I get them!
Friday, February 12, 2010
Aimee's Valentines
Today I wanted to share with you the Valentines that my daughter Aimee made to take to preschool today for their party. We used the Matchbox die to cut out the boxes. For the tops, instead of creating the sliding top, I trimmed the top piece to create flap for the box so when you open it she would have somewhere to write who it was too. I stamped the various critters from the Love Bandit stamp set on some Natural White card stock and then she colored them in with my watercolor pencils. I also got her one of the Love Bot personalized stamps with her name, so she used that to stamp the inside of the boxes as well. We then put little packs of mini M&M's inside. She was very proud of her project! I sure hope her friends liked them! :)


Wednesday, February 10, 2010
Heart Treat Cups
Today I wanted to share with you a card I made using the new Heart Treat Cups. The tab on the card pulls out so that the candy can be removed from the inside of the card without ripping up the card. I CASEd this card here.

To Order Stampin' Up! Products On-Line 24/7, CLICK HERE!

Ingredients:
- Sweetheart stamp set
- Teeny Tiny Wishes stamp set
- Real Red, Pretty in Pink, and Whisper White card stock
- Sending Love Specialty Paper
- Real Red and Old Olive ink
- Word Window, Modern Label, Full Heart, Round Tab, Scallop Trim Border, and Small Heart punches
- Pretty in Pink Taffeta Ribbon
- Big Shot
- Perfect Polka Dots Embossing Folder
- Heart Treat Cups
Saturday, February 6, 2010
Cards from Caroline's Workshop
Today I would like to share with you two cards that I did for a recent workshop. I decided to do a Valentine's day card as well as a card that showed of items from the Sale-a-bration promotion.
 Ingredients:
 Ingredients:
To Order Stampin' Up! Products On-Line 24/7, CLICK HERE!
 Ingredients:
- I {Heart} Hearts stamp set
- Tiny Tags stamp set
- Real Red, Pretty in Pink, and Chocolate Chip card stock
- Sending Love Notes - Hugs
- Real Red, Pretty in Pink, and Chocolate Chip ink
- Medium Jewelry Tag punch
- Trio Flower punch
- Soft Subtles brads
- Big Shot
- Finial Press Embossing Folder
 Ingredients:
- Happy Moments stamp set
- Whimsical Words stamp set
- Whisper White and Bermuda Bay card stock
- Bermuda Bay Patterns Designer Series Paper
- Basic Black, Bermuda Bay, Mambo Melon, Old Olive, and Crushed Curry ink
- Blender Pen
- Bermuda Bay Polka Dot Grosgrain Ribbon
- Scallop Trim Border Punch
Friday, February 5, 2010
Using Stampin' Up!s Borders and Corner Punches
Check out the latest Stampin' Up! YouTube video featuring the new Borders and Corner punches!
Wednesday, February 3, 2010
New Digital Downloads for My Digital Studio
Get ready to accessorize your digital projects with two new digital downloads for My Digital Studio! The Sending Love epoxy brads and the Corduroy Buttons digital downloads are perfect for adding depth and dimension to your digital projects and will coordinate perfectly with other exclusive Stampin′ Up! papers, designs, and colors.
| Item Number | Name | Price |
| 120170 | Corduroy Buttons - Digital Download | $3.95 |
| 120169 | Sending Love Epoxy Brads - Digital Download | $1.95 |


Subscribe to:
Posts (Atom)


