Showing posts with label Decor Elements. Show all posts

Saturday, August 13, 2011

Decor Elements Chalkboards

I really love Stampin' Up!s Decor Elements. I haven't used them as much as I should. I had these two chalkboard Decor Elements for a while now, and never put them up. So I decided it was time. They are so easy to apply it took all of 5 minutes. Don't know what took me so long! Anyway, this first one is one that I got free during this years Saleabration promotion. I applied this one of the inside doors of my Hobby Hideaway (my crafting armoire).

This next one is actually 2 different Decor Elements. I first cut out a piece of the plain Decor Elements chalkboard sheets the same size as my To Do list. I applied that to the inside of the other door of my cabinet. Next I simply applied the To Do List Decor Element on top.

Now I just need to get some chalk! :)

To Order Stampin' Up! Products On-Line 24/7, CLICK HERE!

Friday, December 24, 2010

More Christmas Projects

Hi everyone! I have a couple more Christmas projects to share with you! First, here is the Candy Countdown Calendar Kit I put together for my girls to countdown to Christmas. This kit comes with everything you need to make an awesome advent calendar. I know it is too late for this year, but you get one of these now and put it together for next year! You need to place your order by January 3rd though, before the Holiday Mini catalog ends!


Next, here is another quick project I put together. I bought this vase and decorated it using the Christmas tree Decor Element from the Candy Cane Christmas set. Then I filled it with decorative red and green ornaments. Super easy and super cute! These Decor Elements are also in the Holiday Mini Catalog, so this is also you last chance to get these!

Monday, December 20, 2010

Decor Elements Bucket

Here is another quick project I did using some more of the Decor Elements from the Candy Cane Christmas set. I found this super cute green bucket at the Target Dollar Spot as well. For this project I simply applied the candy cane images I was done! So easy!


To Order Stampin' Up! Products On-Line 24/7, CLICK HERE!

Decor Elements Christmas Plate

Hi everyone! Today I have a super quick project that did with some of the Candy Cane Christmas Decor Elements. I found this cute tray at the Target Dollar Spot a while back. It was definitely too plan by itself, so I rubbed on these Decor Elements and Viola! instant Christmas tray! Love it!

Also, just and FYI - I have so many Christmas projects left to post, that I will be posting twice a day over the next couple of days (once in the morning and once in the evening) so be sure to check back often!

To Order Stampin' Up! Products On-Line 24/7, CLICK HERE!

Thursday, October 21, 2010

Last of the "Spooky Things"

After using my Spooky Things Decor Elements on the two projects posted here and here, I had 3 images left. So I looked around my house to find a place to put them. I decided to adhere the bat and spider to my front door.


Below are some close up shots of these spooky guys.

And last, but not least, I adhered the Raven image to window in my dining room. It looks like he is just perched on the window sill looking in. My dining room is where I hold all my classes so at my last class he was looking over every one. :) (Please pay not attention to all the smudges on the window. With two kids and a dog, there is not a clean window in my house! LOL!)


Saturday, October 9, 2010

Happy Halloween Frame

Today I have a project for you straight out of the Holiday Mini Catalog. I had some Spooky Things Decor Elements left from the pumpkins that I created (posted here), so I decided to create this piece of wall art. I simply took the Happy Halloween image and applied it to the front of the glass of a 8' x 10' frame. I then took a piece of the Nite Owl Designer Paper (the piece with the tree design on it) and cut it so that the tree would be in the bottom of my frame. I then stamped using the Dark and Deary and Baroque Motifs stamp sets to add to the already decorated paper. Once I got the look I wanted, I simply inserted the paper in the frame and hung it on the wall! Easy-peasy!

Ingredients

  • Dark and Deary stamp set
  • Baroque Motifs stamp set
  • Spooky Things Decor Elements
  • Nite Owl Designer Series Paper
  • Old Olive, Tangerine Tango, and Basic Black Classic Ink


To Order Stampin' Up! Products On-Line 24/7, CLICK HERE!


Thursday, October 7, 2010

Spooky Tray

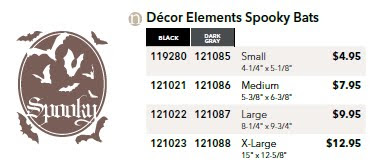
Today I have another super easy project using Stampin' Up!s Decor Elements. For this one I used the Spooky Bats Decor Element. This is the smallest size in Basic Black. I simply rubbed this on a plastic serving tray that I found at the Dollar Spot in Target a while back (love the Dollar Spot for finding awesome things to decorate!). This project took me about 2 minutes to make. Seriously!

This tray is perfect to use as a tray for treats at Halloween! Don't forget that even though Decor Elements are not dishwasher safe, they can be hand washed (just be careful not to scrub too hard!).

And here is a picture of my daughter Aimee modeling the tray. Such a good helper! :)


Tuesday, September 28, 2010

Spooky Things Decor Elements

Today I have a spooky project to share with you using the new Spooky Things Decor Elements! This set of decor elements is awesome, as you get 10 different images on the sheet! I created everything you see here and still have 4 images left! I got these white foam pumpkins from my local craft store. I then simply picked out the images I wanted to use, cut them out, and then simply applied them to the pumpkins! It couldn't be easier! I also added some bling to the pumpkins by using some of the Black Flourish Designer Jewels. I only used part of the package of the jewels, and still have one left over as well!

With this super easy project, you get a lot of bang for your buck! And because the pumpkins aren't real, I will be able to display this project year after year!


To Order Stampin' Up! Products On-Line 24/7, CLICK HERE!

Tuesday, February 16, 2010

Decor Elements Chunky Frame

Today I have a Decor Elements project to share with you. My up-up-upline Tami had done a project using the new Decor Elements Chunky Frame and had it on display at our last group get together. I feel in love with what she had done and had to make one myself! It was so easy! The frame is a lot bigger than I thought (12" x 12" with a 4" x 4" opening). I used the Scallop Frame Decor Element in Chocolate Chip and applied it directly to the frame. Next I used the Sweet Pea Stitched Felt, Pretty in Pink Corduroy Buttons, and the Certainly Celery and Pretty in Pink Satin Ribbon from the Occasions Mini Catalog to embellish the frame. Then I picked out a saying from the Chat Room Rub-Ons (also from the Occasions Mini Catalog) and rubbed that right on the frame. Then last, but not least, I picked out a picture of my younger daughter Allison to put in the frame! So easy and so cute! Love it!


To Order Stampin' Up! Products On-Line 24/7, CLICK HERE!


Monday, January 11, 2010

Full of Sweetness and Wonder

Today I wanted to share with you my first Decor Element I used on a wall (I have done them on a door and paper before, but not on the wall). For this project I got the Sweetness Decor Element in Chocolate Chip and applied it over her crib. I think that this saying defines her to a T. :) Here is a close up shot of the wall.


Here is a shot of the room.

And here is Allison helping to model the shot. :)


To Order Stampin' Up! Products On-Line 24/7, CLICK HERE!


Monday, December 21, 2009

Christmas Decor Element

Today I have my Christmas Decor Element to show you. I made this to go in my season frame (click here to see Halloween and here to see Thanksgiving). For this one I used a medium Jingle All the Way Decor Element in Chocolate Chip. I rubbed it on a piece of Merry Moments Designer Series paper. I added a strip of another pattern paper from the same set and a few snowflakes that I punched out of Very Vanilla card stock with my snowflake punch. I added a gold brad to the center of each one and voila - done!


Here it is framed and hanging on the wall:


Friday, November 13, 2009

Thanksgiving Frame

Remember the Halloween frame that I made using the Spooky Brocade Decor Element? Well, now that Halloween is over, I wanted to swap this picture for a Thanksgiving one. So I got the small Season of Thanks Decor Element in Chocolate Chip. This Decor Element actually comes with three sentiments (see below), however, since they would not all fit in my frame, I picked one and cut it out, along with the florish, to use for this project. To make this, I simply, rubbed the Decor Element onto a 8 x 10 sheet of the Autumn Traditions Designer Series Paper. Next, I added two more strips of Designer Series Paper from the same pack (different designs). On the bottom one I used my Scallop Edge punch and on the top one I use my cutter kit to distress the edge fo the paper. Next I chose 2 buttons out of my Fresh Favorites II button set , tied some linen thread through them, and adhered them with a glue dot. And there you have it! Super easy project!

Next, I simply slipped it into my frame and hung in on the wall!

This is a great way to use the seasonal Decor Elements, as they will only be displayed for a short period of time. By doing it this way, I will be able to display my project year after year!


To Order Stampin' Up! Products On-Line 24/7, CLICK HERE!